


When we are talking about web development, there are two things that every programmer has probably done:
- Used console.log() to debug the code;
- Used alert() to display messages on the screen.
Although both work well and help us develop our systems, they are totally unsuitable for systems in production. That’s why in this article I want to introduce you to SweetAlert2, a JavaScript library that helps us create beautiful, responsive and customized alerts. All this without any other dependency.
SweetAlert2
SweetAlert2 is a JavaScript library that helps us create alerts in our web applications. The project is open source and is available on GitHub under the MIT license. Currently, it is in version 7.12.15. Its success is so much that it has surpassed the 6 thousand stars (almost reaching 7 thousand), 800 forks and 300 releases.
And best of all is that it is compatible with all current browsers:

Figure 1. For browsers marked with *, we need to use a polyfill for the Promises of ES6.
The use of the library is very simple. First, you need to import it into your project. You can use npm:
npm install -- save sweetalert2You can also download and import it into the project or use a CDN:
<script src="sweetalert2/dist/sweetalert2.min.js"></script>
<link rel="stylesheet" href="sweetalert2/dist/sweetalert2.min.css">
Once imported, we use the swal method to create the alerts. The simplest alert is created just by passing the message we want to display as a parameter, as in the following example, where we only display the message “Hello world!”:
// HTML
<button id="message">
 Show message
</button>

// JS
document.getElementById('message').onclick = function(){
  swal("Hello World!");
};
Figure 2. Showing a single message.
To make things more interesting, we can use some of the standard alerts, as in the example below, where we display an error and success message, just specifying its type (similar to what we have in Bootstrap) in the method call:
// HTML
<button id="success-message">
 Show success message
</button>

<button id="error-message">
 Show error message
</button>

// JS
document.getElementById('success-message').onclick = function(){
        swal('Good!', 'Everything is right!', 'success')
};

document.getElementById('error-message').onclick = function(){
        swal('Oh no…', 'Smth is wrong!', 'error')
};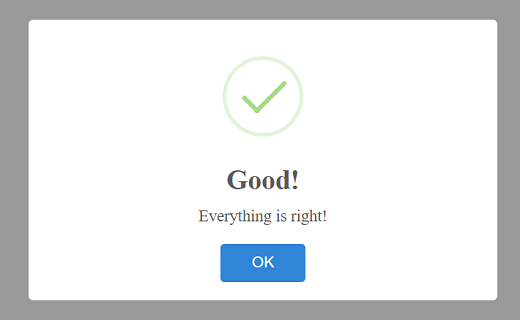
Figure 3. Success message example.
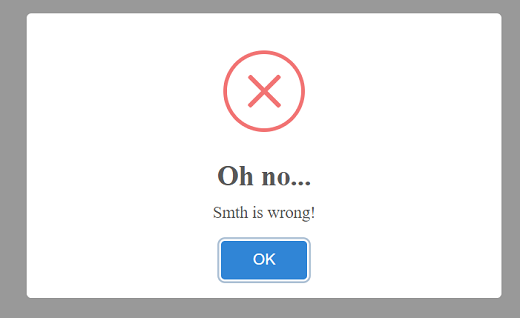
Figure 4. Error message example.
However, SweetAlert2 is capable of so much more. In the example below, we create an alert with various settings, such as title, text, type, whether to show the confirmation/cancellation buttons or not; and what to do if the user clicks on each of them:
// HTML
<button id="message">
 Show message
</button>

// JS
document.getElementById('message').onclick = function() {
  swal({
   title: 'Are you sure?',
   text: "It's a 1 million question!",
   type: 'warning',
   showCancelButton: true,
   confirmButtonColor: '#3085d6',
   cancelButtonColor: '#d33',
   confirmButtonText: 'Yes, sure!',
   cancelButtonText: 'Better I stop…'
 }).then((result) => {
   if (result.value) {
     swal(
       'Congrats!',
       'You are the winner!',
       'success'
     )
   }
 })
};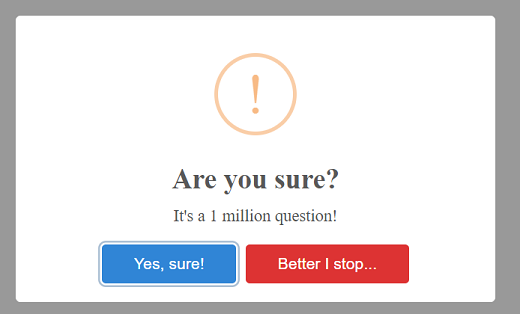
Figure 5. Showing multi-option message.
We have also been able to create very complex alerts like this below, where we have several questions that must be answered in sequence. For this example, we use a few more methods and settings, such as the queue, setDefaults and resetDefaults methods. We use them to set the order of the questions, their look and feel, and reset the look and feel to the default, respectively:
// HTML
<button id="questions">
 Show questions
</button>

// JS
document.getElementById('questions').onclick = function(){
 swal.setDefaults({
  input: 'text',
  confirmButtonText: 'Next →',
  showCancelButton: true,
  progressSteps: ['1', '2', '3']
 })

 var steps = [
  {
   title: 'Hapiness quest',
   text: 'What is your name?'
  },
  'Your age',
  'Your city'
 ]

 swal.queue(steps).then((result) => {
  swal.resetDefaults()

  if (result.value) {
   swal({
    title: 'Done!',
    html:
     'Your answers: <pre>' +
      JSON.stringify(result.value) +
     '</pre>',
    confirmButtonText: 'Awesome!'
   })
  }
 })
};
Figure 6. First quest screen.

Figure 7. Final quest screen.
Conclusion
Pretty cool, isn’t it? We could go on showing several examples of what the library is capable of, but on the official website there are several other examples, such as alerts with:
- AJAX requests
- Custom layout (background, image, colors, etc.)
- Different positioning (note that, by default, it always puts in the middle, regardless of the size of your device)
- Auto close timer
- And much more!
All other possible settings, input types, methods, events, etc., are available on the site as well.
About the Author
Diogo Souza works as a Java Developer at PagSeguro and has worked for companies such as Indra Company, Atlantic Institute and Ebix LA. He is also an Android trainer, speaker at events on Java and mobile world.
